|
Click the links below to see Dennis Green make this presentation in HD video on You Tube.
|
|
Dennis Green - Part 1
|
|
Dennis Green - Part 2
|
|
Because of the frame rate difference of film and TV, the shutter blades of the projector are captured in
varying positions creating a wave through the picture like a fast moving hum bar at the difference frequency.
Even though the blades are in motion, they affect the exposure time across the frame causing uneven brightness
that varies from frame to frame.
Synchronizing the capture with the shutter is difficult because of projector speed drifts, especially
with spliced film.
S-Video in an interface that carries luma (black and white) information and chroma (hue and saturation)
information on separate wires. This interface is free from the cross color and cross luminance of conventional
NTSC composite multiplex.
|
|
It doesn't work well to just shoot the screen.
The flicker from the 3-Blade Shutter in a typical projector creates beat frequencies.
TV ~ 30 fps (actually 60 fps interlaced) versus, professional film shot
at 24 fps (3 X 24 = 72 fps : 60 fps 12 Hz beat frequency) or amateur film shot at 18 fps
3 X 18 = 54 fps : 60 fps 6 Hz beat frequency. There is also a contrast loss from screen.
|
|
Capture at 24 fps using a mirror and a rear-projection screen using a simple device that was popular that used
a first-surface mirror at 45 degrees to reverse the image from the projector and a milk-glass rear-projection
screen about 8 X 10 inches.
Click this link
to a sample of what you get with this sort of rig.
|
|
I considered a projector with a 5-Blade Shutter.
This makes 24 fps X 5 = 120 flicker which is integer related to 60 Hz video, so there is no beat frequency.
Another method is Frame-by-Frame capture, followed by digital frame rate conversion.
A 5-blade shutter would require machining skills and equipment I don't have.
Also, synchronization to camera is required to minimize frames split between video frames.
A 5-blade shutter doesn't work with 18 fps home movie standard.
|
|
Frame Capture requires a frame rate conversion method, probably complex equipment and software. It does not support single-system sound and is a slow process.
|
|
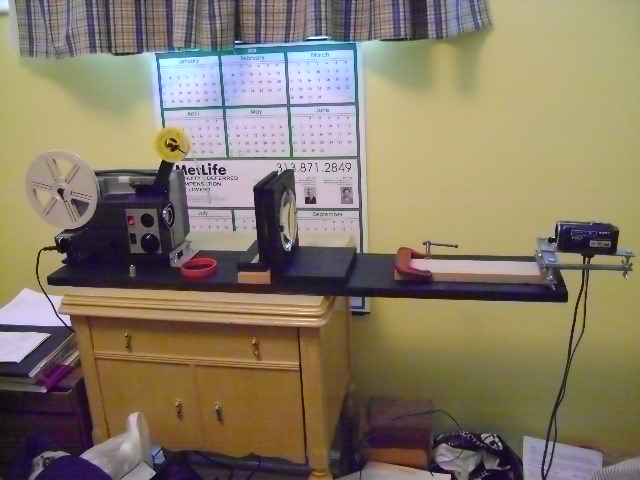
| My Setup for Frame Capture
|
|
For typical projector optics, a large 4.5 to 5-inch condenser lens is needed to create a virtual image for the camera. None of the articles mentioned focal length for the condenser lens. I bought several on clearance specials from Anchor Optical to experiment with. The two longer focal length lenses together were about right. The short one had more flaws in the glass, which show too much. I haven't solved that problem; the focus point is so close to the lens surface that dust specs become black spots. I haven't figured out how to move that plane to blur them out. Most systems use a first-surface mirror at 45 degrees to reverse the image.
My software does the reversing saving me the major construction and alignment headache.
It's not worth it to save about a second of processing time per foot of film during the frame rate conversion.
Camera adjustments are extremely sensitive. Even with my friend's professional studio tripod, it was a struggle.
I constructed a sled using wing-nuts to provide micrometer-like height and tilt adjustments.
Eventually, I will secure it to the baseboard to speed setup.
I also plan to strengthen the supports because camera position is so sensitive that you can see movement
from the flex in the board if you touch it while running.
|
|
CineCap software for frame capture works by triggering a mouse click for each frame.
It padded frames and added interlace for NTSC video.
It includes image reversal to elimiate the mirror.
Since I purchased this software, it was withdrawn from the market and is sold only with a projector purchase.
The commercial systems sell from $1,300 to over $10,000.
I'm working on ideas that use basic common software.
The software captures one frame for each mouse click.
The original system used a micro-switch sensor in the projector wired across the left button of a USB mouse.
It replaced one roller and depended on the pulsation of the film going through the gate.
This didn't work with my model, so I designed an optical sensor for the claw.
|
|
I use a separate mouse circuit for the projector, stripped of its housing.
You can have more than one mouse active.
You place the mouse pointer over the "Capture" button and the projector clicks it for you on each
frame using the second modified mouse.
|
|
The projector requirements for frame capture are:
1) slow motion - Each frame must display for 2 frames of video, one to assure exposure started after
pull down and one for the exposure;
2) A Frame Advance Switch to trigger the capture;
3) A Removable Shutter.
|
|
The projector modifications are:
1) Add a Frame Sensor for the USB mouse interface;
2) A low power light source suitable for projecting directly into the video camera;
3) A Ground Glass background behind film;
4) Remove the Shutter and any Slow Motion Filter;
5) Remove Mask and Widen the Gate. The goal is to crop once in the video camera only and maximize area which allows for TV over-scan.
|
|
The projector must be modified to provide the capture signal to the computer. The normal projection lamp
is so bright it would damage the camera. An LED can provide adequate brightness with no film-stressing
heat and a color temperature that the camera likes. The shutter blades are in the way and must be removed.
The capture is synchronized and timed to avoid the film advance, so there is no need to shutter it.
A projector having variable speed and slow motion between 6 and 8 fps is required to provide capture time
for the computer. Some people build custom drives for regular projectors, but I don't have a machine shop.
I started with a Sankyo that comes with slow motion and variable speed.
|
|
A 5-inch condenser lens is recommended in Internet postings.
The condenser lens creates a virtual image that will be seen by the video camera.
There was no information regarding the best focal length. I tried several on sale at Anchor Optics:
|
|
Lens 1: 113mm DIA X 212mm FL Grade 2
|
|
Lens 2: 97mm DIA X 400mm FL Grade 1
|
|
Lens 3: 125mm DIA X 375mm FL Grade 1
|
|
Looking into the projector, the virtual image is quite small, which places extreme demands on the camera.
|
|
Lens Results
|
|
Lens 1: Edge distortion; Flaws appear as dirt in gate
|
|
Lens 2 & 3: Camera distance excessive
|
|
Lens 2 and 3 stacked, flat sides toward projector worked very well
The first lens of a pair should be the best lens (2)and be free of surface flaws.
|
|
Camera Requirements
|
|
The video camera must be capable of close focus, have manual focus to prevent hunting, and
manual exposure to avoid following intentional fades. A 25X Zoom was needed as the virtual
image is very small. Such long telephoto lenses are only offered on low-end camcorders.
Don't use less than an S-Video interface at 720 x 480. Finding a compatible camera was a challenge.
The optics require lots of zoom and focus range, but the better cameras avoid extreme telephoto.
I could not get surround sound or external mike capability in anything with the optics I needed.
I wanted something for general use, so I ended up with a Sony HD CX-150. If Carl Zeiss optics is
low end, I'd like to see high end in action! I think the color saturation is a tad better with
the 3-CCD cameras, but not as much as in days past. Initial tests show that 8mm film has too little
resolution to bother with HD, which is not supported by my software anyway. Capturing at 720x480 to
match the native DVD resolution was slightly visible compared to the default 640x480, and more so
over NTSC composite video capture. An S-Video interface gadget is so affordable
($20 online with Ulead editing software included!) that it is not worth considering less.
|
|
Lens Shade
|
|
|
I was able to see the camera's reflection against black in the movie. My $20 uncoated lens acted
like a fish-eye mirror. A mask for the camera and a shade solved the problem eliminating the need
for a darkened room. The commercial coated lens was much less trouble, but this solution was a lot
less expensive than the $450 photographic grade lens.
|
|
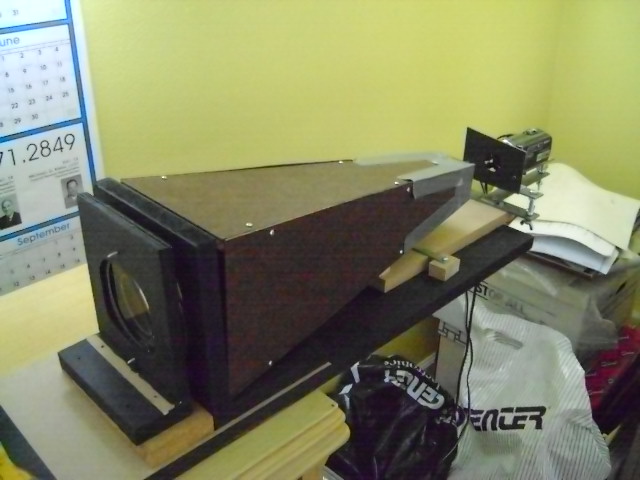
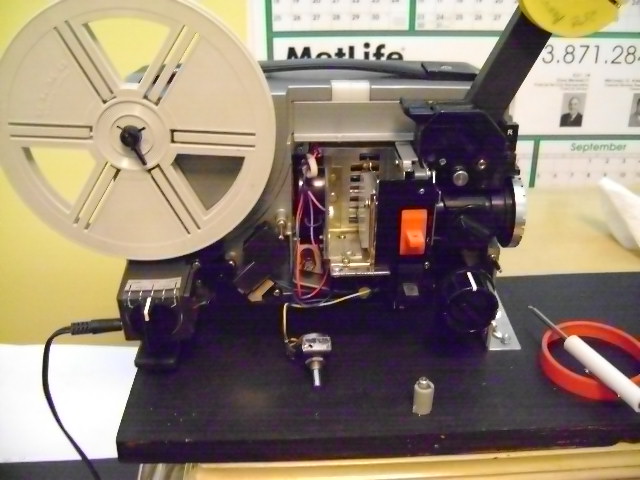
My Projector
|
|
|
I found two of the Sankyo projectors on Amazon. It is not the exact model specified in the on-line
project, but I took a chance on it. The lesser focus/zoom range lens has been the biggest challenge,
mainly due to less close focus range. I have experimented on the older one so far. I have one that
is practically new in case I break it. The mechanical sensor design didn't work, so I created an
electronic optical system.
|
|
Ground Glass in Lamp Holder
|
|
I removed the reflector lamp and found a ground glass that sort of fit the holder.
This provides a smooth evenly illuminated white background for the film.
|
|
LED
|
|
The LED is mounted on a piece of circuit board to provide a heat sink and is set back to prevent a hot spot.
The LED is a 750 ma Natural White, and it is mounted on a circuit board that acts as a heat sink.
The spacing was determined experimentally to get even illumination of the glass. Home movie film is intended to be
projected by a tungsten lamp, so this seemed appropriate and appears to make the camera happy regarding
white balance. I originally tried a 20-watt quartz desk lamp bulb, but it was too yellow and too bright
requiring multiple neutral density filters on the camera. The LED is cool enough that there is no concern
keeping the film paused while making camera adjustments.
|
|
Rectifier and Filter Capacitor
|
|
The projector supplies 12 VAC to the lamp (White wires). There was space behind the terminal board, so I
filled it with the bridge rectifier and capacitor filter, which left less to cram in the lamp compartment.
|